
Marigolds are one of the easiest flowers to experiment with due to accessibility and a simple dye process, yet here I am, 15 years into dyeing, using them for the first time.

One of my 2018 goals was to plant a small dye garden. I bought a few black hollyhocks and lots of coreopsis, along with a few extra marigolds to plant in with the tomatoes. Once a week I’d collect blossoms (always leaving a few for the bees). By the end of the summer I had collected 4oz of dried marigold flowers.

The first time I did this dye, I tossed a handful of blossoms into a jar, poured in simmering water, swirled the mixture until the water turned yellow, and added the wool sample (each sample has a strand of unmordanted wool, alum mordanted wool, and iron mordanted wool). Within a few minutes it looked like this:

Yellow is the most common natural dye color, but doesn’t it amaze each time? It’s as if each petal collected and stored a bit of sunshine. When my wool turned a saturated amber gold, I swore that next year I’d dedicate an entire section of my garden to a flower I’ve underappreciated all these years.
The next time I did this dye, I let the blooms simmer approximately 30 minutes before adding the wool (alum mordanted). I left the skein in the pot for another hour off the heat to make sure the dye thoroughly absorbed into the fiber.
This dye was so simple, so gratifying, I thought it was the perfect dye for a someone who had never dyed before.

Buzzing with passion, fueled by strong afternoon coffee, I brought this up to my brother Martin during one of my creative-life tangents: Wouldn’t it be fantastic to show people who’ve never dyed before, that a little flower can create such brilliant color? This is a crazy idea but some day, SOME DAY, I want to make dye videos!
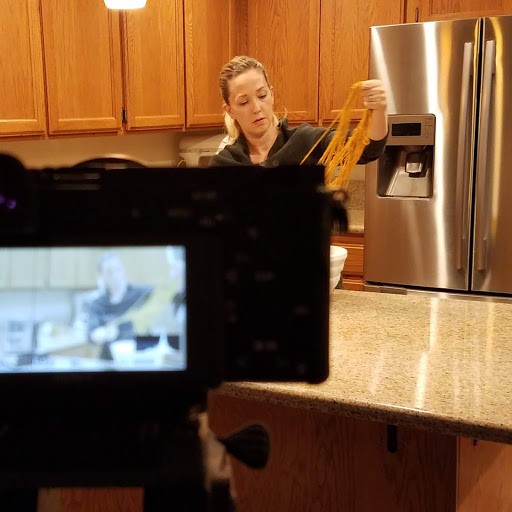
My brother isn’t a dyer; however he is a photographer turned videographer. And one of the traits we both inherited from our Mother is the thrill of a new creative project. He stared me down like he always does (he’s a serious guy), and said something like: You know, I make videos. We could make this happen.
“Some day” turned into a few weeks later. My brother and I spent many hours of quality time together learning how to put together an introductory dye video. Let’s be real, it was an older brother teaching his younger sister about the many time-consuming steps that go into producing a short video.
It was a fun learning process. And isn’t that what a creative life is all about – learning as we go? Next up, create my own You Tube channel. This is an unknown world to me, and honestly it’s a bit overwhelming. I’m fumbling my way through this step. Thankfully I have two 12 year old YouTube experts to hold my hand. It’s a family affair.
UPDATE: Here it is.
Discover more from Myra Made Color
Subscribe to get the latest posts sent to your email.

I love that color and I don’t even like yellow, LOL. I can’t wait to see the video!
Love this video, one question… how much water in the pot with flowers? Thanks
Thank you!
In general, I fill the pot 3/4 full. But the amount of water will not change the intensity of the dye. You want enough water for the yarn to move freely in the dye, so that the the dye will attach evenly to the fiber.
Do you use the flowers fresh or do you dry them, and if so, how?
I use fresh and dried flowers. My method of drying is very simple: I collect them and add them to a paper bag that’s kept in a warm, dry place. I toss them every few days to keep air moving.
Hermoso color que ganas de teñir!! Vi el video lamentablemente no entiendo ingles…ojalá pudieran traducirlo.
Saludos desde Chile.
Where do you buy the wool from? I live in Canada and a lot of these tutorials are made in the US.
I’ve used wool2dyefor.com, dharmatradingcompany.com and knitpicks.com in the past